Let me be real with you – when DALL‑E 3 first rolled out its in‑painting editing tools a couple of years back, I thought it would be a gimmick. Fast forward to 2026, and honestly, I can’t imagine crafting AI art without them. Whether I’m fixing a wonky flag, swapping a boring sky, or slipping a golden retriever into a Christmas photo (more on that later), the editor has become my secret sauce. The best part? It’s not rocket science. A well‑worded prompt and a quick selection are all it takes. I’ve been deep in the trenches experimenting, and today I’m going to walk you through my personal playbook of editing prompts that work like a charm. Grab a coffee, fire up DALL‑E 3, and let’s get your images looking crisp.
1. Give anything a fresh coat of paint
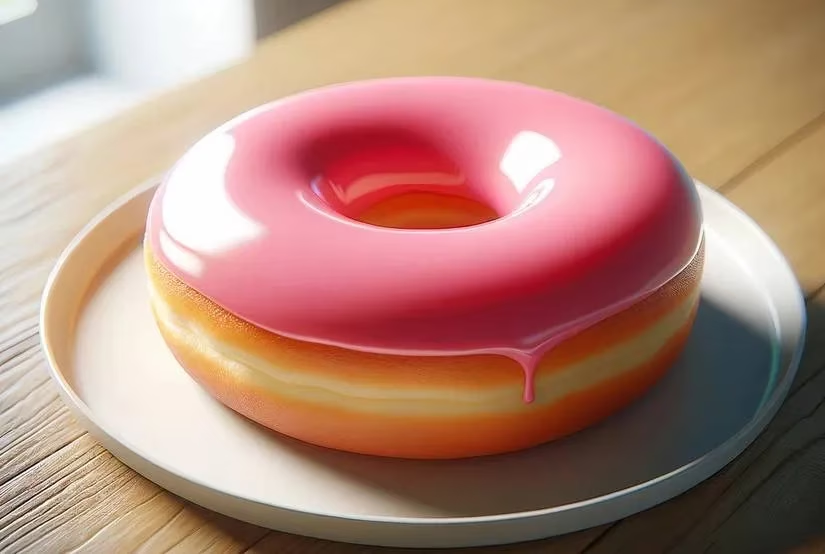
The simplest win you can score is changing an object’s color. Last week I generated a photorealistic donut – mouth‑watering, but the brown glazing felt a bit plain Jane. Instead of regenerating the whole scene, I just selected the glazing area and typed: “Please change the glazing color to pink”. Boom – instant strawberry vibes. The result was exactly what I asked for, and I didn’t even break a sweat. This trick works on clothes, skies, car bodies, you name it. So next time your AI portrait’s shirt clashes with the background, don’t chuck the whole image – just paint it a different shade.
2. Zap unwanted elements like a pro
We’ve all been there: you generate an otherwise perfect street scene, and there’s a giant white truck photobombing the left corner. In the early days I would have just sighed and re‑generated, but not anymore. Using the editor, I selected the truck and asked DALL‑E to remove it. Like a ninja, it vanished from the frame, leaving the rest of the image untouched. It’s a total game‑changer when you want to clean up clutter or get rid of weird artifacts – and let’s be honest, AI loves to sneak in bizarre stuff. Just highlight the offender and tell the system to kiss it goodbye.
3. Correct spelling mishaps and funky flags
I’ve lost count of how many times DALL‑E 3 has given me flags that look like alien hieroglyphs or text that reads like a cat walked across the keyboard. Instead of deleting the whole thing, you can fix these blunders directly. Select the area that’s gone haywire – that garbled sign, that six‑fingered hand – and be specific: “Please correct the text to say ‘Welcome’ and straighten the flagpole.” The more precise you are, the better the AI understands what you want. Couple this with a few prompting best practices (think descriptive, avoid ambiguity) and you’ll transform frustrating results into polished pieces.
4. Upgrade a character’s wardrobe or accessories
Fashion is fleeting, and sometimes your AI character needs a quick style change. I once generated a young tech worker in smart‑casual attire, and while the outfit was on point, the face felt bare. So I selected the face area and prompted: “Add a pair of stylish glasses.” The model remained the same, but now they had that extra intellectual flair I was craving. This works for swapping hats, changing t‑shirt logos, or even turning sneakers into dress shoes. It’s a petite tweak that makes a huge difference, and you don’t have to re‑explain the entire scene from scratch.

5. Swap backgrounds like a boss
Ever wish your portrait had a neon‑lit city instead of a bland office wall? With DALL‑E 3, you can yank out the background and drop in a new one. I took a serene landscape with a plain blue sky and asked the editor: “Change the sky to a dramatic sunset.” The result? A warm, golden‑hour glow that completely altered the mood. The trick here is to select the background region accurately – if you’re sloppy, you might end up with a wonky horizon. But once you nail the selection, it’s like having a personal art director on speed dial.

6. Shift objects around for better composition
Composition is the unsung hero of a killer image, and sometimes you just need to nudge something left or right. I had a lake scene with an island that was too close to the foreground, so I selected it and said: “Move the island further back.” The change was subtle – the AI doesn’t always have a ton of room to maneuver – but it improved the balance. If you need a more dramatic relocation, create some negative space first (maybe remove a tree or two) so the system has breathing room. Then ask to move that car to the right, or shift a cloud to the top corner. It’s a bit like playing a gentle game of chess with your art.
7. Add killer reflections for extra depth
Here’s a pro tip straight from the photographer’s playbook: reflections can elevate a flat image into something magical. You’ll often get water reflections by default when a lake or puddle is present, but I wanted a crystal‑clear city reflection in my lake scene. After selecting the building near the water, I prompted: “Add a sharp reflection of the building on the lake surface.” DALL‑E 3 did change the camera angle a bit, but the reflection looked stunning. Experimentation is key here – sometimes you’ll need to re‑select and tweak your wording to get precisely the mirror effect you want. When it clicks, though, it’s chef’s kiss.
8. Sharpen fuzzy details
Not every AI generation comes out pin‑sharp. Sometimes a building looks a tad soft or a face seems slightly out of focus. Instead of wringing your hands, select the blurry area and ask: “Add a bit of sharpness.” I did this with a modern lakeside tower, and the difference was night and day – the edges became crisp, giving the whole scene a more professional feel. Don’t overdo it, or you’ll end up with crunchy artifacts, but a gentle sharpen can salvage a picture that’s almost perfect.
9. Introduce new characters – including furry friends
Here’s where things get fun. After generating a cozy family Christmas gathering, I realized there was no dog – and what’s a holiday scene without a happy pup? I first tried a broad instruction (“Please add a golden retriever sitting on the floor and looking happy”), but it transformed the entire image. So I refined my approach: I selected the empty floor space and repeated the prompt. It took a couple of tries, but I finally got a grinning golden retriever right where I wanted. The people shifted a bit each time, but the overall scene stayed warm and festive. The lesson? Persistence pays off, and selecting a specific area gives the AI a tighter leash.
10. Keep a can‑do attitude and iterate
I’m not gonna sugarcoat it – DALL‑E 3’s editor is still learning, and you might not hit the bullseye on the first attempt. I’ve had edits where the background warped weirdly or a person’s expression turned creepy. But here’s the thing: treat it like a collaboration, not a vending machine. Refine your selection, rephrase your prompt, and give it another whirl. The more you play around, the better you’ll understand how the model interprets different commands. In 2026, the feature is more stable than its early 2024 days, but that human touch remains the X factor.
At the end of the day, DALL‑E 3’s editing capabilities are a massive time‑saver and a creative playground rolled into one. Whether you’re fixing a tiny boo‑boo or completely reimagining a scene, these nine techniques are your ticket to AI art that stands out from the crowd. So next time you generate something that’s almost there, don’t reach for the delete button – grab the editor and make it your own. Happy creating!
Comments